
Applies to
This document applies to the following software and versions:
- AtlantixEM Site Controller 2.0.x
- AtlantixEM Central Site 2.0.x
Overview
This section is a guidance on how to use multiple network cards in your deployment.
Based on your network topology, you may need to add multiple network cards to your deployment in order to allow AtlantixEM communicates with all your peers in the Corporate network. You may also needs multiple network cards if you are palnning to deploy a Site Controller or a Central Site in a DMZ networl or in a different network than your regular LAN.
Possible configurations
Based on your network topology you needs to decide how to configure AtlantixEM networking. Sections below cover different scenario.
Scenario 1
In this scenario, AtlantixEM is placed in a different network than you regular LAN. This configuration is an option if you want to connect AtlantixEM Site Controller to another AtlantixEM Central Site without a VPN connection.
Figure below show this scenario:
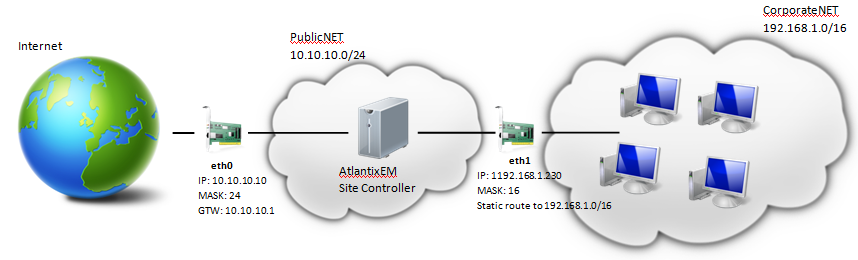
Requirements for this scenario are:
- one network interface eth0 on the public network segment or behind a NAT. This interface will be used to access the Site Controller from Internet
- one network interface eth1 on the Corporate network segment. This interface will be used to access Site Controller from the internal LAN. This network interface will also be used for the communications between the Site Controller and all hosts under monitoring.
- the interface etho must be the default gateway in the network configuration
- the interface eth1 is not the default gateway. On this interface there must be a static route for your internal LAN.
Changes required on the AtlantixEM
To implements this scenario you must perform the following tasks. It is assumed that eth0 is the public network and eth1 is the private network. It is also assumed that you already configured the public interface eth0.
Add a new network interface on the vApp
To add a new netwrok interface on the AtlantixEM vApp:
- Shutdown the vApp via VMware console or vApp management web UI (https://<vApp IP>:5480)
- Add a new network interface on the private/Corporate network. This will be the eth1
- Power on the vApp
Reconfigure OS to recognize the new network interface
After the vApp initialize login via VMware console as root to configure new network adapter:
- Login as root user on Virtual Machine console and execute
# cd /etc/sysconfig/network-scripts/ - Create a new file named ifcfg-eth1 and fill all required information (MAC, IP, MASK). For this example the IP address is set to 192.168.1.230 and the network mask is 255.255.0.0. Do not add a default gateway here.
- Create a new file named route-eth1. Insert a line like in this example: 192.168.0.0/16 via 192.168.1.230 eth1
- In the file /etc/sysconfig/network append a the following line GATEWAY=10.10.10.10 (this is the IPIof the public network interface eth0)
- Restart the vApp
Network configuration is done.
One thought on “Adding multiple network cards to a Site Controlle/Central Site”