
Applies to
This document applies to the following software and versions:
- AtlantixEM Site Controller 3.x
- AtlantixEM Central Site 3.x
Intended Audience
This information is intended for IT decision makers, architects, administrators, and other who need to familiarize themselves with the components and capabilities of Atlantix Enterprise Monitoring. Whit this information, architects, and planners can determine whether Atlantix Enterprise Monitoring satisfies the requirements of their enterprise for efficiently and securely delivering a monitoring solution to their corporate and end users. The example architectures help planners understand requirements and setup effort for a successful deployment.
Planning process overview
The planning process helps architects and/or administrators at making the best decisions to complete a successful deployment of Atlantix Enterprise Monitoring. By following guidelines provided in this document you will be able to design and deploy the right configuration to better fit your needs.
It is highly recommended the followings of guidelines here ahead to avoid infrastructure issues, poor system performance or system limitations.
If you are not planning a deployment in your production network, you can avoid the reading of this document. If you just need to evaluate this product in a lab environment you can refer to the Quick Installation Guide available on the atlantixlab knowledge base.
Before continue with reading, it is recommended you have a complete understanding of the product overview and product features. Refer to the Documentation Guide available on the atlantixlab knowledge base for more information.
Determining infrastructure requirements
Atlantix Enterprise Monitoring version 3 has been designed to run on hardware with limited resources. However a minimum of system requirements must be met to allow the product to works as designed. Next sections will guide you on sizing the infrastructure to fit your needs.
Implementation methods
Atlantix Enterprise Monitoring version3 is available as virtual appliance, pre-built appliance with dedicated hardware (no rack mount) and as ISO file for dedicated hardware deployment.
Depending on your requirements and on the number of devices or endpoints you need to monitor, you can choose between one of the given implementation methods.
Choose your method
The following table helps to identify the right implementation method. Questions on the left side will guide you to identify the right solution to adopt.
| AtlantixEM IV appliance | AtlantixEM virtual appliance | AtlantixEM on dedicated hardware | |
| A virtualization platform is not available in my corporate network | Y | Y | |
| Number of endpoints to monitor less than 40 | Y | Y | Y |
| Number of endpoints to monitor in the range of 50 up to 1000 | Y | Y | |
| I don’t know the right number of endpoints to monitor | Y❶ | Y | |
| The number of endpoints is more than 1000 | Y❶ | Y | |
| I require Multiple Site Controller in my deployment | Y | Y |
❶ You may need to increase the number of virtual CPU and memory size from default values.
Table below specify the minimum hardware requirements needed to deploy AtlantixEM as virtual appliance or as dedicated physical server:
| AtlantixEM virtual appliance | AtlantixEM on dedicated hardware | |
| Disk space requirements | 40 GB | 40 GB recommended physical drive configurations are hardware RAID 1 or RAID 5 (3+1) |
| Memory size | 4 GB or 8 GB if the number of endpoints is greater than 1000 | 8 GB |
| CPU configuration | 4 vCPU or 4×2 vCPU if the number of endpoints is greater than 1000 | 2×4 core processors |
| Network cards | 1 network card (2 network cards may be required if you plan to expose services outside you corporate network) ❶ |
1 network card (2 network cards may be required if you plan to expose services outside you corporate network) ❶ |
❶ You may need to add additional network cards if you are planning to give remote access to your deployment via Internet network. Check Network requirements section for more about.
Basic network requirements
Core features of AtlantixEM requires that all endpoints or remote devices are reachable in you network. Based on the checks you want to execute you may require different protocols and ports are permitted between AtlantixEM and the remote endpoints. To access AtlantixEM web interface you can use any of the supported Web browser. Table below provides the full list of protocols and ports in use:
| Feature | Protocol | Port | Direction |
| Access to AtlantixEM web UI | TCP | 443 | Admin workstations to AtlantixEM |
| Access to AtlantixEM Remote Shell feature | TCP | 4200 | Admin workstations to AtlantixEM |
| Checks via NAGIOS client (NRPE) | TCP | 5666 | AtlantixEM to remote endpoint |
| Checks via NAGIOS client (NSClient) | TCP | 12489 | AtlantixEM to remote endpoint |
| Checks via SNMP get/walk methods | UDP | 161 | AtlantixEM to remote endpoint |
| SNMP trap from remote devices | UDP | 162 | Remote endpoint to AtlantixEM |
| Inventory agent | TCP | 80/443 | Remote endpoint to AtlantixEM |
| Push agent for UNIX | TCP | 22 | AtlantixEM to remote endpoint |
| Push agent for Windows | TCPUDP | 139, 445137, 138 | AtlantixEM to remote endpoint |
Advanced network configurations
In a multi backend configuration, you may require to connect two or more Site Controllers to a Central Site. Communication between a Site Controller and a Central Site is encrypted via pre-shared-key and tunneled via HTTPS protocol. Depending on your network topology, you may require additional firewall configuration to permit communication between AtlantixEM components.
In a multi backend configuration the communication direction between components is from Central Site to Site Controller.
Multi backend on the same LAN
If you are planning a multi backed in the same LAN make sure your Site Controller are reachable from the Central Site network. If you include DMZ networks in this scenario, open firewall communication to allow Central Site connect to the Site Controller in the restricted networks. Check ports requirements in the Base network requirements section.

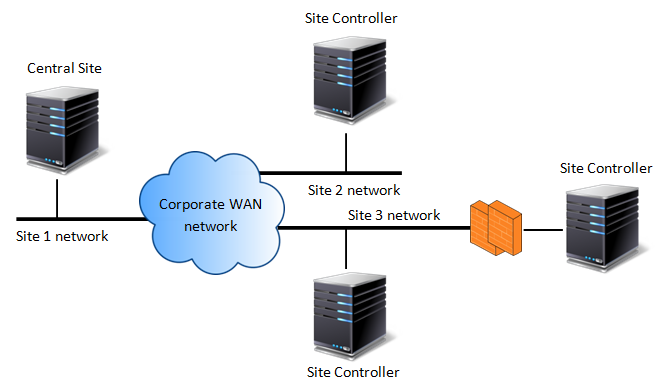
Multi backend for multiple sites
If you are planning a multi backed to monitor multiple sites in the same WAN make sure your Site Controller are reachable from the Central Site network. If you include local or remote DMZ networks in this scenario, open firewall communication to allow Central Site connect to the Site Controller in the remote restricted networks. Check ports requirements in the Base network requirements section.
Multi backend for multiple customers
If you are planning a multi backed to monitor multiple customers with different and independent network segments you do not require complex network infrastructure to protect communication between AtlantixEM components. The communication between Central Site and remote Site Controller or IV appliance is protected with a pre-share-key and tunneled over HTTPS protocol.
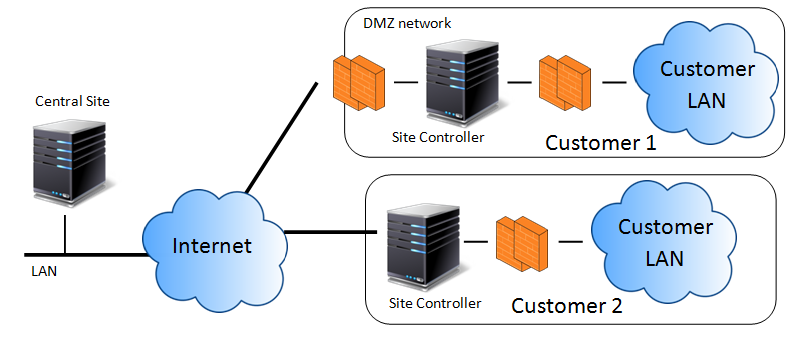
It is highly recommended to do not expose a Site Controller or an IV appliance direct on Internet network. We suggest employing a firewall protection in front of AtlantixEM to protect your deployment from attackers. Section Network best practices suggest advanced configurations to help you protect your remote network.
Network best practices
To improve the overall network protection in a multi customer deployment or if you have a remote site without any firewalls you can follow best practices in this section.
Use a reverse proxy
A reverse proxy solution avoids the direct exposure of a Site Controller on the internet network. There are no special requirements so any reverse proxy solution can be adopted like Microsoft IIS ARR, SQUID. Make sure you allow redirection of HTTPS connection on ports 443 and HTTP/HTTPS connection on port 4200.
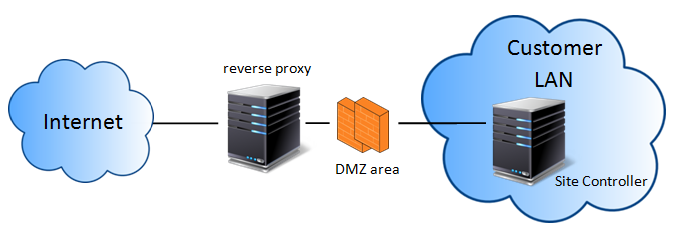
If you are planning to not expose Remote Shell feature you can avoid HTTP/HTTPS on port 4200.
Enable Site Controller firewall
If you cannot use a reverse proxy solution, it is highly recommended to enable firewall service on the Site Controller you are exposing. You must use a secondary network connected to the internet network. Enable and configure the local firewall service to protect the dedicated network adapter.
| NOTE: The secondary network adapter must be configured as default gateway. If needed, add static routes to your internal networks |
For more information about how to configure a secondary network adapter please refers to AtlantixEM v3 Installation Guide available on atlantixlab knowledge base.
Supported agents and clients
AtlantixEM supports different method for monitoring endpoints. Different methods are:
- With agents on remote endpoint
- Agent less via SSH protocol
- Agent less via SNMP protocol
Based on the type of monitoring you choose, AtlantixEM may collect or not certain information. You can find the list of available information that AtlantixEM can retrieve from an endpoint based on the monitoring type you choose:
| Information retrieved | SNMP checks | SSH checks | Agents |
| Basic endpoint environment stats | Y | Y | Y |
| Advanced endpoint environment stats | Y | Y | |
| Inventory and hardware specs | Y |
If you plan to deploy AtlantixEM agents on your endpoints check the following table for a complete list of all supported operating system:
| 32bit | 64bit | |
| Linux | ||
| Ubuntu server 14.04 LTS | Y | Y |
| CentOS (from 5.x to 6.x) | Y | Y |
| RedHat (from 5.x to 6.x) | Y | Y |
| Microsoft Windows | ||
| Windows XP/2003 (all versions) | Y | Y |
| Windows 7/2008 (all versions) | Y | Y |
| Windows 8/2012 (all versions) | Y | Y |
| Oracle Solaris | ||
| 10 (SPARC and x86) | Y | |
| 11 (SPARC and x86) | Y | |
Planning outcomes
At the end of the planning process, you should be able to identify all AtlantixEM components you require in your deployment. You should also have a picture of network requirements, traffic flow and ports you need to open to allow AtlantixEM features works in your deployment.
If you need more information or you need support to complete the planning process, please refers to atlantixlab technical support.