
Applies to
This document applies to the following software and versions:
- AtlantixEM Site Controller 3.x
- AtlantixEM Central Site 3.x
Audience
This information is intended for IT decision makers, architects, administrators, and other who need to familiarize themselves with the components and capabilities of Atlantix Enterprise Monitoring. Whit this information, architects, and planners can determine whether Atlantix Enterprise Monitoring satisfies the requirements of their enterprise for efficiently and securely delivering a monitoring solution to their corporate and end users. The example architectures help planners understand requirements and setup effort for a successful deployment.
Overview
This paper will guide you through the installation process of an AtlantixEM Site Controller. You must perform all steps (where applicable) in the given order to successfully deploy the product.
The installation process sequence covers:
- Check all prerequisites before to continue
- [if is an IV appliance] Connect the IV appliance to your network
- [if is a virtual appliance] Deploy the OVA file in you virtualization platform
- Configure networking
- Configure Site Controller general settings
- [optional] Configure and download agents and commands
- Finalize installation
At the end of the installation procedure you are ready to start customize your AtlantixEM deployment.
Prerequisites
Before to start with the installation process check all requisites are satisfied (where applicable). Missing requisites may render your deployment unresponsive or you can experience later issues.
- Obtain or reserve static IP addresses for all AtlantixEM components
- A DNS registration is suggested for all static IPs
- Make sure all AtlantixEM Site Controller can reach endpoints and devices you need to monitor
- Make sure you Central Site can reach all Site Controller via HTTPS protocol
- [optional] Configure network name resolution by specifying one or more DNS servers from your corporate network on all Site Controller. Having name resolution enabled, let Discovery service identify the names of your endpoints.
- Make sure you use one of the supported browser from the table below:
| Browser | Supported versions |
| Microsoft Internet Explorer | 10.x11.x |
| Google Chrome | 40.x and later |
|
AtlantixIV installation
If you are installing an AtlantixEM IV appliance follow steps below to complete hardware installation.
Check picture below to identify network ports.
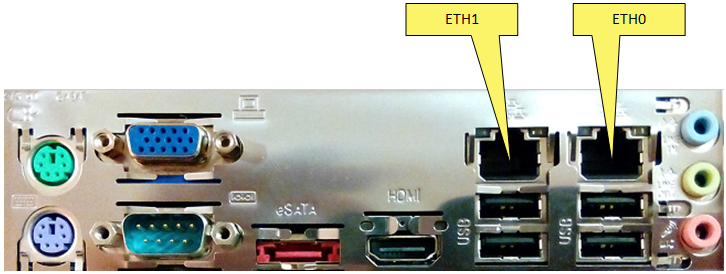
Start system installation. You need a keyboard and monitor to access appliance console.
- Connect physical cables (network, keyboard, monitor and power)
- Power on the appliance and wait the console prompt on the screen
- Access console by using root and password as username and password
- Use script below (replace values between < > with your configuration):
/bin/cat > /etc/resolv.conf <<EOF
nameserver <IP_ADDR_OF_A_VALID_DNS_SERVER>
search <YOUR.DOMAIN.COM>
EOF
/bin/cat > /etc/hosts <<EOF
127.0.0.1 localhost localhost.localdomain
::1 localhost localhost.localdomain
<IP_ADDR_OF_SC> <SC_NAME> <FQDN_SC_NAME>
EOF
/bin/cat > /etc/sysconfig/network <<EOF
NETWORKING=yes
HOSTNAME=<SC_NAME>
EOF
/bin/cat > /etc/sysconfig/network-scripts/ifcfg-eth0 <<EOF
DEVICE=eth0
TYPE=Ethernet
ONBOOT=yes
NM_CONTROLLED=yes
BOOTPROTO=static
DEFROUTE=yes
PEERDNS=yes
PEERROUTES=yes
IPV4_FAILURE_FATAL=yes
IPV6INIT=no
NAME="System eth0"
IDADDR=<IP_ADDR_OF_SC>
NETMASK=<NETMASK>
GATEWAY=<DEFAULT_GATEWAY>
EOF
- Reboot the appliance
- Wait for the appliance to come up
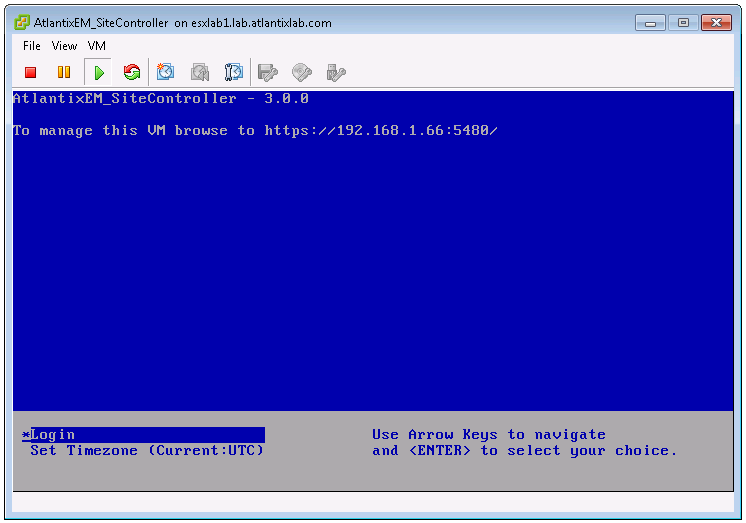
OVF deployment
If you are installing AtlantixEM Site Controller or Central Site from OVA file follow steps below to complete appliance deployment:
- Import and deploy the OVA file in your virtual infrastructure (check specific vendor guides for further information). You can customize import parameters to better fit your needs.
- Power on the virtual appliance and wait for the Welcome screen on the appliance console
- Use your preferred browser to connect to the appliance management web interface. IP address and ports are specified on the Welcome screen
- On the appliance management interface access with root and password as username and password
- In the System tab click Time Zone and set your preference.
- Click Save Settings
- Click on the Network tab and then click Address
- Change IPv4 Address Type in static and specify
- An FQDN name for your Site Controller or Central Site
- Default gateway
- At least one DNS server to use
- IP address and netmask
- Click Save Settings
- Click on System tab and from Information page click Reboot
- Wait for the appliance to come up
AtlantixEM Site Controller installation
Once you complete your Site Controller network configurations, you can start customizing your environment.
Configure Site Controller general setting
Connect with your web browser to https://<name_or_IP_of_your SC>/. Use administrator and password as username and password.
In the system dashboard:
- Click on General Settings
- In the General tab expand This node settings and customize
- Site Name: short name of site
- Service group name: this name is used to group all active services monitored on this Site Controller
- [optional] Modify Auto rollback setting:
- It is recommended to don disable this feature. Auto rollback helps systems administrator to easy rollback to stable configuration in case of errors
- [optional] Under Proxy settings specify a proxy configuration to access internet:
- If your network does not requires a proxy keep it disabled
| NOTE: By default, a Site Controller requires internet access to download agents, services, commands and system updates. If you use an internal Central Site as central repository, you can prevent Site Controller to access internet. |
- [optional] Configure Update service to download updates, command and services definitions and agents in the Site Controller local repository:
- Click Update service tab
- Click Info for Default AtlantixLab repo
- Enter UserID and Token from you atlantixlab registration
- Click Save changes and then click Close
- Click Save changes in the General setting window to save your changes
Setup monitoring for localhost
Configure the Site Controller to monitor the localhost.
Connect with your web browser to https://<name_or_IP_of_your SC>/. Use administrator and password as username and password.
In the system dashboard:
- Click Manage endpoints
- In the Manage endpoints window click Add node button
- In the General settings pane:
- Select Linux as default profile
- Specify DNS hostname of your Site Controller or localhost if you do not have a valid DNS in your network
- Specify an host alias
- Specify 127.0.0.1 as IP Address
- Click Apply changes red button
- In the Apply changes window click Immediately to commit your changes
Finalize Thruk backed configuration
Complete THRUK backend configuration to finalize Site Controller installation.
Connect with your web browser to https://<name_or_IP_of_your SC>/. Use administrator and password as username and password.
In the system dashboard:
- Click All services
- In the Backends configuration
- Set Type: livestatus
- Set Connection: /tmp/live.sock
- Click Test button to verify connection
- Click Save changes
- Close All services window
Configure Email options
Configure the relay mail server the Site Controller will use to send out notifications:
Connect with your web browser to https://<name_or_IP_of_your SC>/. Use administrator and password as username and password.
In the system dashboard:
- Click Notification
- In the Notification settings window:
- Specify a valid FROM to send out mails
- Specify the host name (FQDN) or the IP address of your mail server
- Specify an SMTP port
- Click Save changes
| NOTE: This version of AtlantixEM does not support SMTP authentication. Use an open relay server to send out mails. |
Populate Agents local repository
If you need to push NAGIOS Agent and OCS Inventory agent to your endpoints, you need to populate local repository of your Site Controller.
Connect with your web browser to https://<name_or_IP_of_your SC>/. Use administrator and password as username and password.
In the system dashboard:
- Click Update service
- In the Update service window expand Available agents
- Select agents for operating systems you need and click Download button
NOTE: Depending on your internet connection capabilities and on the number of agents you selected for download, this operation may require several minutes to complete. - Click Close
- You can check progresses from Core logs in the system dashboard.
Installation is now finished.
Advanced network configuration
If you are planning an AtlantixEM deployment with multiple network cards, this section will explain steps required to add and configure a secondary Ethernet interface. Depending on your deployment you can follow one of the suggested guides below.
| NOTE: On all AtlantixEM products the network interface eth0 must be used for communication with endpoints. Additional network adapters can be used to access web interface and other user-oriented services. If multiple network adapters are installed NEVER USE ETH0 to as interface from/to internet. |
It is recommended to modify network configuration to add multiple network cards soon after the installation is completed. This will avoid errors in modifying interfaces properties.
Add a secondary network adapter – IV appliance
If you need a secondary network adapter on an AtlantixEM-SC IV appliance, just reserve an IP address (if static) and connect the network cable on the port labeled eth1.
The appliance firewall is already configured to accept HTTPS connection on that interface.
Check steps below to setup eth1 as default gateway:
- Access console via SSH by using root and password as username and password
- If you are using a static IP address for ETH1 create a file named /etc/sysconfig/network-scripts/ifcfg-eth1 with a content like below:
DEVICE=eth1
TYPE=Ethernet
ONBOOT=yes
NM_CONTROLLED=yes
BOOTPROTO=static
DEFROUTE=yes
PEERDNS=yes
PEERROUTES=yes
IPV4_FAILURE_FATAL=yes
IPV6INIT=no
NAME="System eth1"
IDADDR=<YOUR_IP_ADDR_HERE>
NETMASK=<YOUR_NETMASK_HERE>
GATEWAY=<YOUR_DEFAULT_GATEWAY_HERE>
- Make sure the line GATEWAY is not present (or remove if it is) in the file /etc/sysconfig/network-scripts/ifcfg-eth0
- Make sure the line GATEWAY is not present (or remove if it is) in the file /etc/sysconfig/network
- Restart the appliance with the command reboot
Add a secondary network adapter – virtual machine
If you need a secondary network adapter on an AtlantixEM-SC virtual machine, you need to:
- reserve an IP address (if static) and connect the network cable on the port labeled eth1.
- poweroff AtlantixEM virtual appliance
- add a virtual network cards to the virtual machine (check instruction from your vendor)
- configure eth1 as specified below
To setup eth1 as default gateway:
- Access console via SSH by using root and password as username and password
- If you are using a static IP address for ETH1 create a file named /etc/sysconfig/network-scripts/ifcfg-eth1 with a content like below:
DEVICE=eth1
TYPE=Ethernet
ONBOOT=yes
NM_CONTROLLED=yes
BOOTPROTO=static
DEFROUTE=yes
PEERDNS=yes
PEERROUTES=yes
IPV4_FAILURE_FATAL=yes
IPV6INIT=no
NAME="System eth1"
IDADDR=<YOUR_IP_ADDR_HERE>
NETMASK=<YOUR_NETMASK_HERE>
GATEWAY=<YOUR_DEFAULT_GATEWAY_HERE>
- Make sure the line GATEWAY is not present (or remove if it is) in the file /etc/sysconfig/network-scripts/ifcfg-eth0
- Make sure the line GATEWAY is not present (or remove if it is) in the file /etc/sysconfig/network
Update firewall configuration
Once the network adapter is configured, you must enable firewall on that interface:
- Execute commands below to enable firewall on eth1 to accept only HTTPS and TCP 4200 for Remote Shell:
iptables -P INPUT ACCEPT
iptables -P OUTPUT ACCEPT
iptables -P FORWARD ACCEPT
iptables -F
iptables -A INPUT -i lo -j ACCEPT
iptables -A INPUT -i eth0 -j ACCEPT
iptables -A INPUT -i eth1 -p tcp --tcp-flags ALL NONE -j DROP
iptables -A INPUT -i eth1 -p tcp ! --syn -m state --state NEW -j DROP
iptables -A INPUT -i eth1 -p tcp --tcp-flags ALL ALL -j DROP
iptables -A INPUT -i eth1 -m state --state ESTABLISHED,RELATED -j ACCEPT
iptables -A INPUT -i eth1 -p tcp --dport 443 -j ACCEPT
iptables -A INPUT -i eth1 -p tcp --dport 4200 -j ACCEPT
iptables -A INPUT -i eth1 -j DROP
chkconfig iptables on
service iptables save
service iptables restart
- For user convenience this script is also located under /usr/share/atlantix/firewall-config.sh. You can execute it to apply changes above.
See also
- Atlantix Enterprise Monitoring 3 – What’s new
- Atlantix Enterprise Monitoring 3 – Product guide
- Atlantix Enterprise Monitoring 3 – Planning and deployment guide
- Atlantix Enterprise Monitoring 3 – Installation guide
- Atlantix Enterprise Monitoring 3 – Administration guide