
Applies to
This document applies to the following software and versions:
- AtlantixEM Site Controller 3.x
- AtlantixEM Central Site 3.x
Intended Audience
This information is intended for anyone who wants to configure and administer AtlantixEM 3. The information is written for experienced systems and network administrators who are familiar with AtlantixEM, and monitoring platform solutions.
Features overview
This guide covers the use and administration of the following features you can find in the new AtlantixEM version 3 products family:
- System dashboard, system configuration area, navigation and notification bar
- Operator dashboard
- System general settings
- Notification settings
- Users management
- System updates and commands
- Configuration backup and rollback
- Network discovery
- Endpoints management
- Remote shell
Check next sections for more about.
1 AtlantixEM Site Controller
1.1 Dashboard
The System Dashboard is the main working area where you can access all AtlamtixEM features. Thesystem Dashboard has 3 main sections:

1.1.1 Status bar
The status bar helps users to navigate from one backend window to another one. As example you move from AtlantixEM system dashboard to THRUK and back by clicking Home link.
The Status bar has a notification area where users can access notifications log. Notification area shows critical events from different subsystems. As example, during a push agent operation you can quickly check overall status of the ongoing task by looking at notification area.
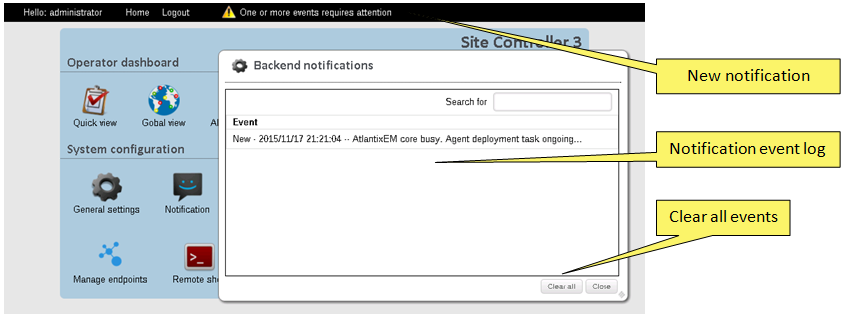
The following critical events are logged into notification area:
- Push agents tasks
- NAGIOS configuration errors
When a NAGIOS configuration error is raised, the Site Controller failed to apply endpoints configuration changes. To troubleshoot this kind of issues administrators can investigate by looking in the Core Logs file. In this scenario, the Site Controller dumps the last lines of NAGIOS sanity check results. Check Access core logs section in this document for more information.
1.1.2 Operator dashboard
The Operator dashboard offers quick access buttons, Global services status table, Asset center, THRUK backend, NAGIOS classic view.
Quick access
Quick Access icons are configurable shortcuts to open most common views. Administrators can customize shortcuts from General settings pane. Common usage of Quick access buttons are shortcuts to THRUK status dashboards. Check Site Controller general settings section in this document for more information.
All services
All services icons open the full list of active checks on all endpoints. This is the real time view of all monitored endpoints. From this view you can troubleshoot ongoing issues, submit forced status update for a specific checks and all basic operations you can execute on the classic NAGIOS services view.
Assets
Assets icon lets users access Asset management interface. Assets management offers a complete view of endpoints hardware and software specifications. You can search for specific hardware information and/or installed software. Check Assets management section in this document for more information.
THRUK view
Thruk icon lets users open THRUK classic view. Thruk is the interface to NAGIOS core services and lets Site Controller to communicate with Central Site. You can use Thruk classic view to access all extended operations on remote objects, customize Thruk backend and draw your own maps with Panorama View feature. Check Use Thruk section in this document for more information.
NAGIOS view
NAGIOS icon lets users open NAGIOS classic view. You can use NAGIOS classic view to access all extended operations on remote objects. Check Use NAGIOS section in this document for more information.
1.1.3 System dashboard
The System dashboard lets privileged users make changes to AtlatnixEM configuration. From the System dashboard you can manage endpoints configuration, execute push agents operation and discover you network devices.
General settings
General settings icon permits the Site Controller customization. You can modify system options like Site name, Service group name, proxy configuration and download providers list. Check Site Controller general settings section in this document for more information.
Notifications
Notification icon lets privileged users setup or make change to the default relay host configuration used by AtlantixEM to send out notifications. Check Setup email relay host section in this document for more information.
Users management
Users icon permit privileged users to manage users and permissions. Check Manage Users and permissions section in this document for more information.
Update service
Update service icon permits privileged users to download and install system updates, services and commands definitions and AtlantixEM Agent packs for all supported endpoints operating systems. Check Download system updates section in this document for more information
Configuration Rollback
Configuration rollback permits to execute a Site Controller configuration rollback to a stable state. Check Rollback configuration in this document for more information.
Discovery
Discovery icon permits privileged users execute a network discovery task. Network discovery lets you easily discover and identify all devices in a given IP network range. A discovery task can import discovered devices inside AtlantixEM. Check Discover endpoints section in this document for more information.
Manage endpoints
Manage endpoints permits privileged users manage endpoints configuration for NAGIOS core. Manage endpoints give you access to endpoints/profiles/hostgroups/services and commands configuration. Check Manage endpoints section in this document for more information.
Remote Shell
Remote shell enables remote access to Site Controller OS shell. Check Enable remote shell section in this document for more information.
Core logs
Core logs permit privileged users to access system event log for troubleshooting purpose. Check Access core logs section in this document for more information.
1.2 System configuration
The System configuration pane in the main dashboard is a reserved area for privileged users and systems administrator. From System Configuration you can customize your AtlantixEM installation and access all administrative tasks.
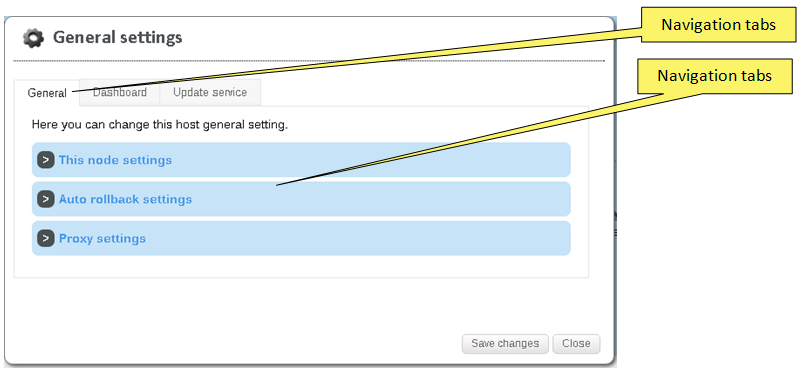
1.2.1 Site Controller general settings
The General settings panel permits privileged users to customize system configuration. An administrator or a Power user can:
- Change Site Name and Services group name
- Configure Rollback and versioning
- Configure internet proxy settings
- Change quick access link reference on the operator dashboard
- Configure remote download providers for updates/commands and agents download.
Change Site Name and Services group name
The Site Name and Services group name fields are used to compose a NAGIOS servicegroup file to group all services monitored by this Site Controller. You can use the service group later in a THRUK panorama view to place an overall status indicator in your maps. This status indicator gives you a quick view of problem services in the site. Default values are:
- Site name: Site 1
- Services group name: All Site 1 services
To change values perform the following tasks:
- From the System dashboard click on General settings
- In the General tab expand This node settings toggle box
- Replace fields with your own values
- Click Save changes button
- Click Close to exit
Configure Rollback and versioning
Rollback feature execute a copy of NAGIOS configuration files every time an administrator submit a change. A rollback copy is created when the following events occur:
- Endpoints configuration change (create, edit, delete)
- Profiles configuration change (create, edit, delete)
- Hostgroups configuration change (create, edit, delete)
- Services configuration change (create, edit, delete)
- Commands configuration changes (create, edit, delete)
If an administrator execute a configuration change and the new configuration contains one or more errors, the Site Controller does not apply the new one and notify the user by posting an event in the Notification bar.
To rollback to a previous configuration check Rollback configuration section in this document.
To modify rollback settings perform the following taks:
- From the System dashboard click on General settings
- In the General tab expand Auto rollback settings toggle box
- Enable/disable Rollback feature
- If enabled, select the number of previous copies to maintain
- Click Save changes button
- Click Close to exit
Configure proxy settings
If your network requires proxy to access internet, you can configure proxy settings to allow Site Controller access atlantixlab repositories. Access to public repositories allows you to download the following components:
- System updates and hotfix
- Definition of services
- Definitions of commands
- AtlantixEM agents for supported operating systems
To configure proxy perform the following tasks:
- From the System dashboard click on General settings
- In the General tab expand Proxy settings toggle box
- Enable/disable proxy feature
- If enabled:
- specify IP address of your proxy server
- specify port of your proxy server
- If your proxy requires authentication:
- specify a valid user and password
- Click Save changes button
- Click Close to exit
| NOTE: This version of AtlantixEM supports only HTTP proxy. |
Change quick access link reference
To customize shortcuts for Quick view and Global view buttons perform the following tasks:
- From the System dashboard click on General settings
- In the Dashboard type or paste your preferred links
- Click Save changes button
- Click Close to exit
Configure remote download providers
A download provider is a valid source repository where a Site Controller can download the following objects:
- System updates: are security, hotfix and core updates for a Site Controller. You need a valid subscription to access atlantixlab
- Services definitions: are preconfigured NAGIOS checks you can execute on monitored endpoints
- Commands definitions: are preconfigured NAGIOS commands you can use to execute checks on monitored endpoints
- Agents: an agents package contains all software and prerequisites to install the following agents on one or more endpoints:
- NAGIOS client (NRPE or NSClient++)
- OCSInventory agent
- Required dependencies
For a complete list of available agents and supported operating systems check Planning and deployment guide section Supported agents and clients.
| NOTE: To configure and use a download provider you must have a valid subscription or access code |
To configure a download provider perform the following tasks:
- From the System dashboard click on General settings
- In the Update service tab click New button and specify:
- Base repo URL (example http://download.atlantixlab.com)
- A valid UserID
- A valid token
- Check Enable provider
- Click Save changes button
- Click Close to exit
- Click Save changes button on the General settings pane
- Click Close to exit
1.2.2 Setup email relay host
The Notification panel permits privileged users to configure a relay host to allow AtlantixEM send notification when one or more events occur.
To setup a relay host perform the following tasks:
- From the System dashboard click on Notification
- Specify the following values:
- From: this is the sender of all notification. Make sure your relay host accept the FROM you are specifying
- SMTP gateway: the IP address of your relay host
- Gateway port: the SMTP protocol port of your relay host
- Click Save changes to save and close
| NOTE: This version of AtlantixEM supports only open relay systems. You cannot use SMTP authentication. |
1.2.3 Manage users and permissions
The User panel permits administrators to manage users and permissions.
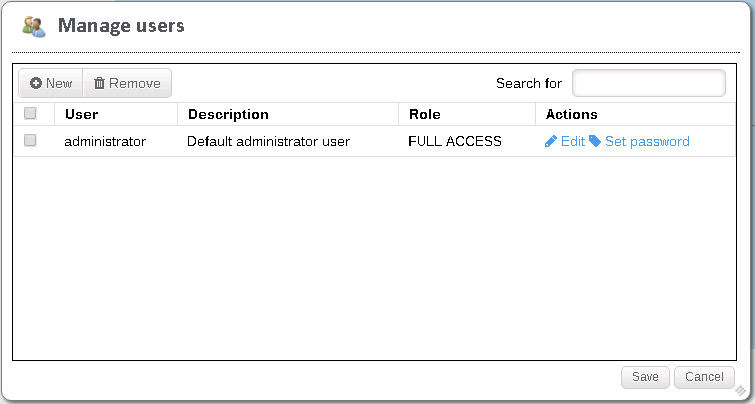
AtlantixEM implements a role based access. The following roles are available:
- Full permissions: give full access and permissions to all features in the Site Controller
- Power user: give full access and permissions to most features in the Site Controller. Power users cannot change backend configuration (THRUK and NAGIOS). You can use this role if you need to connect the Site Controller to a Central Site. CS to SC connection requires at least one user account shared between the two components.
- Read only: give access to all features in read only mode. Configuration panels and privileged options are not available for read only users.
To create a new user performs the following tasks:
- From the System dashboard click on Users
- In the Manage users pane click the New button
- Specify a user name
- Click Edit button to change:
- description
- change user role
- Click Set password to change password
- Click Edit button to change:
- Click Save button to confirm changes
1.2.4 Download system updates, agents and commands
The Update service panel permits privileged users to download and install system updates, services and commands definitions and AtlantixEM Agent packs for all supported endpoints operating systems.
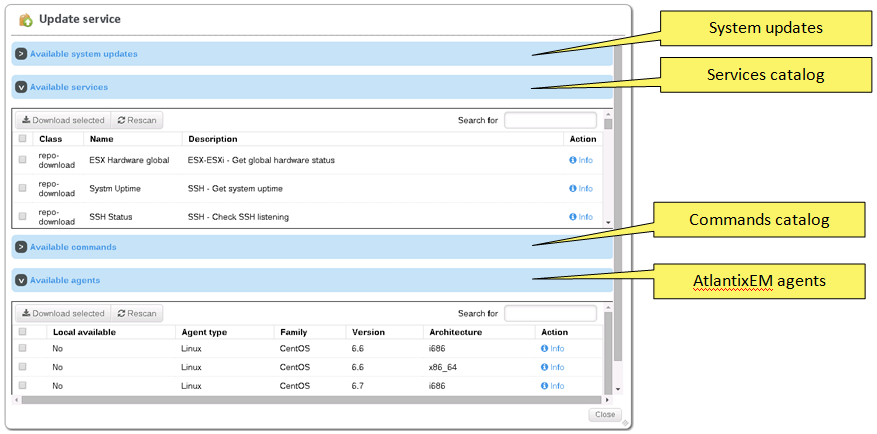
System updates
A system update is a software package to update AtlantixEM product. System updates are classified as:
- Security update: if the package contains updated versions of one or more subsystems to fix a vulnerability
- Hotfix: if the package contains updated versions of one or more subsystems to correct a software failure
- Core update: if the package contains updates for backend services (THRUK and NAGIOS)
System updates are released by atlantixlab and made available to all customers who have a valid subscription.
Update service automatically handle updates dependency. If a system update requires a previous update installed, AtlantixEM shows only prerequisite as available for installation.
To install a system update performs the following tasks:
- From the System dashboard click on Update service
- In the Update service pane expand Available system update toggle box
- Review and select updates you need to install
- Click Install update button to start installation
You can check update task progress from Core logs.
Available services
Services catalog is a list of preconfigured NAGIOS check you can enable on monitored endpoints. If you need to execute checks on a new device, verify if the services catalog already contains needed configurations.
When you download one or more services, the service catalog is updated to hide objects already installed in your Site Controller. Click Rescan button to refresh list soon after a download task complete execution.
| NOTE 1: This version of AtlantixEM does not verify if a local copy of commands required to execute selected checks exist. If you download one or more services without required commands you can always download missing commands later. Use Manage endpoints to assign missing commands. |
| NOTE 2: Services from catalog may contain placeholders in the configuration string. Placeholders are used to identify arguments that require customization. Examples of placeholders are IP addresses, username and password. To avoid NAGIOS configuration errors, do not assign services with placeholders. |
To download one or more services perform the following tasks:
- From the System dashboard click on Update service
- In the Update service pane expand Available services toggle box
- Review and select services you need to install
- Click Download selected button to start installation
You can check download progress from Core logs.
Once a services download task is completed, you can access and customize new services with Manage endpoints feature. Check Manage endpoints section in this document for more information.
Available commands
Commands catalog is a list of preconfigured NAGIOS commands you can use to setup services. If you need to prepare new checks for devices, verify if the command catalog already contains needed configurations.
When you download one or more commands, the command catalog is updated to hide objects already installed in your Site Controller. Click Rescan button to refresh list soon after a download task complete execution.
| NOTE: Commands from catalog may contain placeholders in the configuration string. Placeholders are used to identify arguments that require customization. Examples of placeholders are IP addresses, username and password. To avoid NAGIOS configuration errors, do not use commands with placeholders. |
To download one or more commands perform the following tasks:
- From the System dashboard click on Update service
- In the Update service pane expand Available commands toggle box
- Review and select commands you need to install
- Click Download selected button to start installation
You can check download progress from Core logs.
Once a commands download task is completed, you can access and customize new commands with Manage endpoints feature. Check Manage endpoints section in this document for more information.
Available agents
Agents catalog is the list of AtlantixEM agents you can install on monitored endpoints. A single agent package contains:
- NAGIOS client (NRPE or NSClient++)
- OCSInventory agent
- Prerequisites software packages
Endpoints with AtlantixEM agent installed are capable to send asset inventory information to the Site Controller. The followings information is collected:
- Hardware specifications (sys board full specs, memory, cpu full specs, bios full specs, IO devices, network cards, HDD)
- Software catalog (all installed software packages with vendor, family, software name and arch)
AtlantixEM provides agents for the following target endpoints:
| 32bit | 64bit | |
| Linux | ||
| Ubuntu server 14.04 LTS | Y | Y |
| CentOS (from 5.x to 6.x) | Y | Y |
| RedHat (from 5.x to 6.x) | Y | Y |
| Microsoft Windows | ||
| Windows XP/2003 (all versions) | Y | Y |
| Windows 7/2008 (all versions) | Y | Y |
| Windows 8/2012 (all versions) | Y | Y |
| Oracle Solaris | ||
| 10 (SPARC and x86) | Y | |
| 11 (SPARC and x86) | Y | |
Once an agent pack is downloaded to the local Site Controller repository, administrators can push installation to one or more endpoints with a Push agent task from Manage Endpoint panel. Check Manage endpoint configuration section in this document for more information.
To download one or more agent packs perform the following tasks:
- From the System dashboard click on Update service
- In the Update service pane expand Available agents toggle box
- Review and select agents you need to download
- Click Download selected button to start installation
You can check download progress from Core logs.
| NOTE: Depending on your internet connection and from the bandwidth avails on atlantixlab public repositories, the download task may require a while. |
1.2.5 Rollback configuration
The Configuration rollback panel permits administrators to rollback to a previous stable configuration. If you made changes to endpoints configuration and the new configuration contains one or more errors, the Site Controller does not apply it.
In case of one or more configuration issues, the navigation bar posts a notification. Administrators, can access Core logs to investigate. Core logs dumps the NAGIOS pre check logs containing a detailed description of errors.
| NOTE: A rollback operation execute restore of NAGIOS configuration only. You cannot rollback configuration of other subsystems in a Site Controller. |
If you are unable to identify what caused configuration errors, perform a rollback to a stable point from Configuration rollback panel.
To execute a configuration rollback performs the following tasks:
- From the System dashboard click on Configuration rollback
- Select a previous configuration from the drop down list
- Click OK to initiate a rollback operation
You can check rollback progress from Core logs.
1.2.6 Discover endpoints
The Discover endpoints panel permits administrators to execute a network discovery task to identify all endpoints in your network. AtlantixEM discovery process is based on NMAP portscan.
Results of a discovery task can be customized by administrators before import endpoints in your configuration. Upon completion of a discovery task, the following information are shown:
- Endpoint name or IP address
- OS family
- Default profile assigned based on NMAP results
If you do not specify a valid DNS server in the Site Controller network configuration, the discovery task returns the IP address of detected endpoint as endpoint name.
| NOTE: A discovery task returns DNS name of detected endpoint only if a valid DNS servers has been specified in the Site Controller network configuration. |
To execute a discovery task performs the following:
- From the System dashboard click on Discover
- Specify start and end IP address of the network segment to scan
- Click Start discover to submit job
On the completation, AtlantixEM display results table. Administrators can refine results:
- click on endpoint name to change the name
- click on endpoint Default profile to change endpoint type
If the discovery task identifies and endpoint already imported, the Duplicate columns is set to yes.
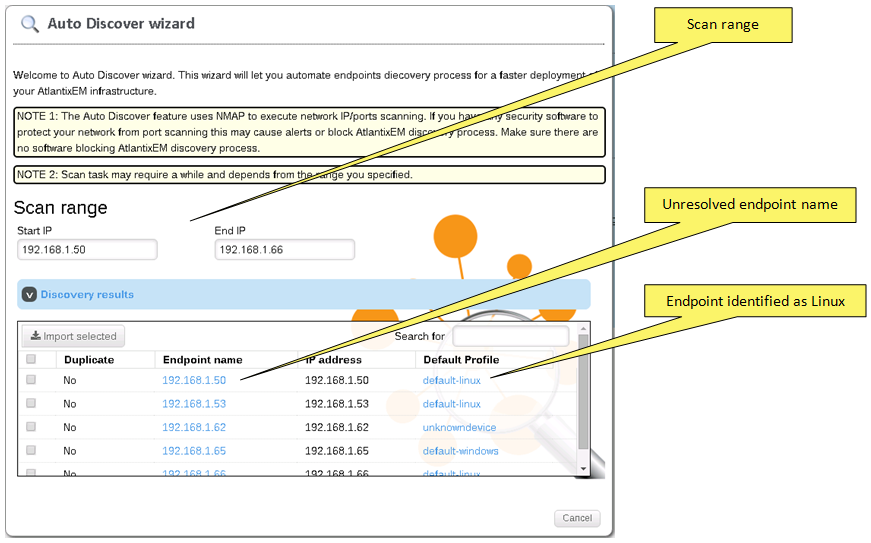
To import one or more endpoints, select entries and click Import selected button. You can customize imported endpoints configuration with Manage endpoint panel.
Check Manage endpoint configuration section in this document for more information.
1.2.7 Manage endpoints configuration
The Manage endpoints panel permits administrators to handle NAGIOS configuration. You can mange configuration of the following objects:
- Endpoints: set of all monitored devices
- Profiles: set of default NAGIOS checks organized by device class/OS family
- Hostgroups: set of user defined NAGIOS checks
- Services: set of available checks
- Commands: set of commands used by all configured services
Manage endpoints panel has three main sections:
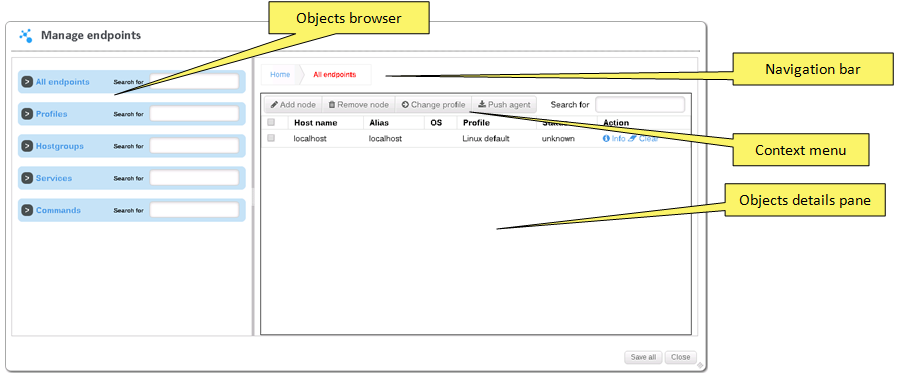
Objects browser
The object browser permits users to navigate across available objects. Object browser toggle boxes are searchable to quick find what you are looking for.
Navigation bar
The navigation bar gives an immediate feedback on the hierarchy of the selected object.
Context menu
The context menu display actions you can perform on different objects depending on user selection.
Objects details pane
Display selected object details and permit object customization. If user select the whole toggle box in the object browser, the details pane show all objects in the class with the most important attribute.
When you modify one or more properties, AtlantixEM ask user to save changes. Two options are available:
- Apply changes immediately
- Queue all changes and apply once
If you choose to apply changes immediately, AtlantixEM send new configuration to NAGIOS backend and execute a reload of subsystems.
If you choose to queue all changes, AtlantixEM temporary store modifications in memory. No changes are submitted to NAGIOS. To write queued changes and reload NAGIOS configuration you must click on Save changes button in the Manage object window.
1.2.7.1 Endpoints
The All endpoints object, allows management of all monitored devices. You can perform the following operations on endpoints:
- Manually add a new endpoint
- Remove an endpoint
- Add/remove a NAGIOS check (service) on endpoints
- Add/remove hostgroups on endpoint
- Change default profile
- Submit a Push agents task on one or more endpoints
Add a new endpoint (manually)
To manually add a new endpoint to NAGIOS configuration perform the following tasks:
- In the Manage endpoint pane click on All endpoints toggle box
- In the Context menu click Add node button
- Choose a default profile for the new endpoint
- Specify the hostname and alias
- Specify the IP address
- [optional] specify extended NAGIOS properties
- Click Apply changes button
Remove an endpoint
To remove an endpoint from NAGIOS configuration perform the following tasks:
- In the Manage endpoint pane click on All endpoints toggle box
- Select one or more endpoints to remove
- Click Remove node button
- Confirm changes
| NOTE: A remove operation does not remove the endpoint from Assets management. You must remove manually the endpoint from Assets management. |
Add a new NAGIOS check (service)
To add a new service to a specific endpoint performs the following tasks:
- In the Manage endpoint pane expand All endpoints toggle box
- Select the endpoint to modify
- In the details pane expand Available services
- Select one or more service to enable on the selected endpoint
- Click Add selected button
- Click Apply changes button
Remove a NAGIOS check (service)
To remove a service from specific endpoint performs the following tasks:
- In the Manage endpoint pane expand All endpoints toggle box
- Select the endpoint to modify
- In the details pane expand Active checks
- Select one or more service to remove
- Click Remove selected button
- Click Apply changes button
| NOTE: You cannot remove checks enabled via hostgroup or profile membership. To remove checks enabled via hostgroup or profile membership removes the endpoint from hostgroup or change the default profile. |
Add endpoint to a hostgroup
To add an endpoint as member of hostgroup performs the following tasks:
- In the Manage endpoint pane expand All endpoints toggle box
- Select the endpoint to modify
- In the details pane expand Available hostgroups
- Select one or more hostgroup
- Click Add selected button
- Click Apply changes button
Remove endpoint from hostgroup
To remove an endpoint from hostgroup performs the following tasks:
- In the Manage endpoint pane expand All endpoints toggle box
- Select the endpoint to modify
- In the details pane expand Active checks
- Select one or more service subscribed via hostgroup you want to remove
- Click Remove selected button
- Click Apply changes button
| NOTE: If the hostgroup contains multiple services, by removing a service from selected endpoint all services from the hostgroup will be removed. You cannot remove a single service subscribed via hostgroup from an endpoint. |
Change default profile
To change a default profile performs the following tasks:
- In the Manage endpoint pane click on All endpoints toggle box
- In the Context menu click Change profile button
- From the Change profile windows select the target profile and click OK
| NOTE: If you change a default profiles all checks (services) currently active will be replaced with new checks from target profile. |
1.2.7.2 Submit a Push agent task
AtlantixEM provides agent packages for all supported operating system. The Push agent task allows administrators to remotely install agents on selected target endpoints.
To start a Push agent task you must provides very basics information. AtlantixEM will inspect targets to gather additional systems information required to select a suitable agent pack.
You can choose between several push agent methods:
- Manual: AtlantixEM shows only on screen instruction on how to download and install package
- Automatic (interactive): AtlantixEM download package on targets in a temporary folder. Administrators must log on target endpoints and run the installation
- Automatic (silent): AtlantixEM download and install package on selected targets without user interaction
Manual
If you choose to execute a manual push agent task you must download agent pack on target endpoints and then start the installation. Perform the following tasks to complete a manual deployment task:
- Connect on target endpoint (via ssh on Unix/RDP on Windows)
- Download the agent package from your Site Controller:
for Unix – use SCP to copy package from SC_IP:/usr/share/atlantix/download/agents
for Windows – use UNC path to copy package from \\SC_IP\download\agents
- Execute the package to unpack files
- Install the package by running:
for Unix:
# /your_temp_path/bundle/atlantix-clients-installer.sh <SC_IP_ADDR> local
for Windows:
C:\Atlantix_temp\install.bat <SC_IP_ADDR>
- Review log files in case of issues:
for Unix – Log is on standard output
for Windows – C:\LOGS\
Automatic (interactive)
If you choose to execute an automatic (interactive) push agent task, the installation package is placed in a temporary folder. Depending on the target OS family, the temporary folder can be one of the followings:
- for Windows endpoints: C:\Atlantix_temp and the package name is exe
- for Unix (Linux and Solaris) endpoints : /tmp and the package name is self-extract.bin
Execute steps 4 and 5 from Manual installation paragraph to complete installation.
Automatic (silent)
To initiate a push agent performs the following tasks:
- In the Manage endpoint pane click on All endpoints toggle box
- Select one or more endpoint with the same OS family (all windows nodes or all unix nodes)
- Click on Push agent button
- In the Agent deployment wizard select target OS family (Windows or Unix) and click Next
- Set deployment type to Automatic
- Set installation type to Silent
- [optional] specify credential with administrative or root access to selected endpoints
- Click Next
- Click Submit task button to start installation
You can check installation progress from Core logs.
1.2.7.3 Profiles
The All profiles object, allows management of default configuration assigned to endpoints. You can perform the following operations on profiles:
- Add new profile
- Remove a profile
- Duplicate profile
- Add/remove a NAGIOS check (service) on profiles
Add new profile
To create a new profile performs the following tasks:
- In the Manage endpoint pane click on All profiles toggle box
- In the Context menu click New profile button
- Specify the following values:
- Display name: is the friendly name for the profile
- Profile name: is the internal name for the profile
- Click Apply changes to update configuration
Once you have the new profile, you can add/remove checks.
Remove a profile
To remove a profile performs the following tasks:
- In the Manage endpoint pane click on All profiles toggle box
- In the details pane, select one or more profiles to remove
- Click Remove profile button
- Click Save changes in the Manage endpoint window to save configuration
| NOTE: Before to perform a delete profile operation, make sure no endpoints or checks are using the profile. By removing in use profile, you may generate an inconsistent NAGIOS configuration. |
Duplicate profile
To duplicate a profile performs the following tasks:
- In the Manage endpoint pane click on All profiles toggle box
- In the details pane, select the source profiles to clone
- Click Duplicate profile button
- Specify a new name for the target profile
- Click Ok button
- Click Save changes in the Manage endpoint window to save configuration
| NOTE: A duplicate profile operation execute a clone of source object. Target profile will inherit all properties, active checks and endpoints used by the source profile. |
Add/remove a NAGIOS check on profiles
To modify profile configuration perform the following tasks:
- In the Manage endpoint pane expand All profiles toggle box
- Select the profile you need to modify
- In the details pane use Active services to remove one or more active check
- In the detail pane use Available service to add one or more new checks
- Click Apply changes button to save configuration
1.2.7.4 Hostgroups
All hostgroup object, allows management of configuration assigned to endpoints via hostgroups membership. You can perform the following operations on hostgroups:
- Add new hostgroup
- Remove a hostgroup
- Duplicate hostgroup
- Add/remove a NAGIOS check (service) on hostgroup
Add new hostgroup
To create a new hostgroup performs the following tasks:
- In the Manage endpoint pane click on All hostgroups toggle box
- In the Context menu click New hostgroup button
- Specify the following values:
- Display name: is the friendly name for the hostgroup
- Profile name: is the internal name for the hostgroup
- Click Apply changes to update configuration
Once you have the new hostgroup, you can add/remove checks.
Remove a hostgroup
To remove a hostgroup performs the following tasks:
- In the Manage endpoint pane click on All hostgroups toggle box
- In the details pane, select one or more hostgroups to remove
- Click Remove hostgroup button
- Click Save changes in the Manage endpoint window to save configuration
| NOTE: Before to perform a delete hostgroup operation, make sure no endpoints or checks are using the hostgroup. By removing in use hostgroup, you may generate an inconsistent NAGIOS configuration. |
Duplicate hostgroup
To duplicate a hostgroup performs the following tasks:
- In the Manage endpoint pane click on All hostgroups toggle box
- In the details pane, select the source hostgroup to clone
- Click Duplicate hostgroup button
- Specify a new name for the target hostgroup
- Click Ok button
- Click Save changes in the Manage endpoint window to save configuration
| NOTE: A duplicate hostgroup operation execute a clone of source object. Target hostgroup will inherit all properties, active checks and endpoints used by the source hostgroup. |
Add/remove a NAGIOS check on hostgroup
To modify hostgroup configuration perform the following tasks:
- In the Manage endpoint pane expand All hostgroup toggle box
- Select the hostgroup you need to modify
- In the details pane use Active services to remove one or more active check
- In the detail pane use Available service to add one or more new checks
- Click Apply changes button to save configuration
1.2.7.5 Services
All services object, allows management of NAGIOS checks. You can perform the following operations on services:
- Add new service
- Remove a service
- Duplicate service
- Remove check from endpoints/hostgroups
Add new service
To create a new service performs the following tasks:
- In the Manage endpoint pane click All services toggle box
- In the Context menu click New service
- Specify the following values:
- Name: is the NAGIOS check display name
- Class: is a generic label to group one or more services together
- Command: the command this service will use
- Command parameters: arguments to pass down to the command in use
- Click Apply changes button
| NOTE: Command parameters field does not execute syntax checking.Command parameters field does not execute syntax checking. |
Remove a service
To remove a service performs the following tasks:
- In the Manage endpoint pane click All services toggle box
- In the Context menu select one or more service to remove
- Click Remove service button
Duplicate service
To duplicate a service performs the following tasks:
- In the Manage endpoint pane click All services toggle box
- Select the source service to clone
- In the Context menu click Duplicate Service
- Specify the name for the new service
- Click OK
- Click Save changes button in the Manage endpoint window
| NOTE: A duplicate service operation execute a clone of source object. Target service will inherit all properties, hostgroup and endpoints used by the source service. |
Remove check from endpoints/hostgroups
To remove endpoints or hostgroups from a service performs the following tasks:
- In the Manage endpoint pane expand All services toggle box
- Select the service you need to modify
- Expand Used by endpoints to remove endpoints
- Expand Used by hostgroup to remove hostgroups
- Select one or more objects to remove
- Click Remove button
- Click Apply changes to save
1.2.7.6 Commands
All commands object, allows management of NAGIOS command. You can perform the following operations on commands:
- Add new command
- Remove a command
- Duplicate command
Add new command
To create a new command performs the following tasks:
- In the Manage endpoint pane click All commands toggle box
- In the Context menu click New command
- Specify the following values:
- Name: is the NAGIOS command name
- Class: is a generic label to group one or more command together
- Command line: command line definitions
- Click Apply changes button
| NOTE: Command line field does not execute syntax checking. |
Remove a command
To remove a command performs the following tasks:
- In the Manage endpoint pane click All commands toggle box
- In the Context menu select one or more commands to remove
- Click Remove command button
Duplicate command
To duplicate a command performs the following tasks:
- In the Manage endpoint pane click All command toggle box
- Select the source command to clone
- In the Context menu click Duplicate command
- Specify the name for the new command
- Click OK
- Click Save changes button in the Manage endpoint window
1.2.8 Enable Remote Shell support
The Remote Shell panel permits administrators to enable remote access to the Site Controller. Remote access is protected over HTTPS protocol. Administrators can create a onetime token to share with tech support. A single session has a customizable default timeout to protect Site Controller from unauthorized access/sessions.
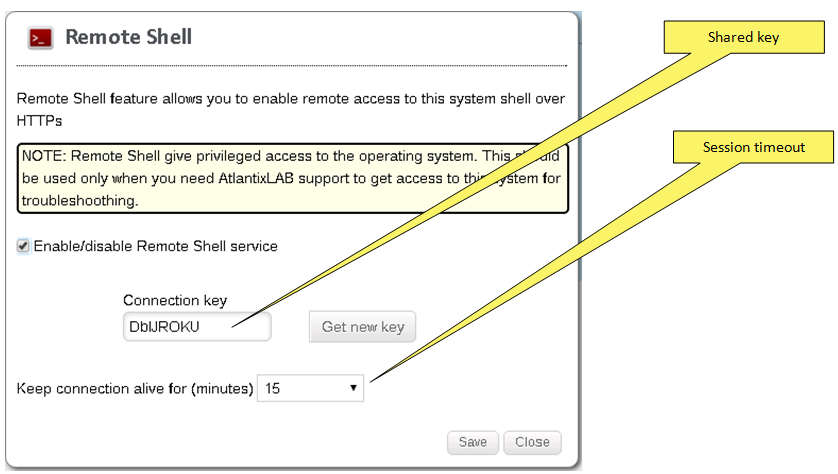
!! PAY ATTENTION WHILE USING REMOTE SHELL FEATURE !! NEVER SHARE ACCESS KEY WITH UNAUTHORIZED PEOPLE.
To enable remote access perform the following tasks:
- In the System configuration pane click Remote Shell icon
- Check Enable Remote Shell service checkbox
- Click Get new key to generate access token
- Set Keep connection alive in minutes
- Click Save button to enable access
1.3 Assets management
Assets management panel give access to hardware and software inventories. Collection task is executed on client side by all endpoints with AtlantixEM agents installed. Endpoints collect and update AtlantixEM database with the following schedule:
- on Windows endpoints every 1 hour
- on Unix endpoints every day
Assets management includes the following preconfigured views:
- Dashboard:
- Operating systems count
- Software top ten installations
- Servers and workstation hardware catalog
- endpoint full properties view
- operating system catalog
- software full properties view
Dashboard
The dashboard panel gives an overview of items in the asset catalog.
Assets distribution by family groups endpoints distribution by asset type. Assets type can be Servers and workstations, Printers and scanners, network and storage devices.
All OS pie chart groups windows and unix/linux operating system by versions.
Software top installations chart shows most installed software in the catalog.
Servers and workstations (hardware catalog)
The servers and workstations view give users access to full hardware properties. This view includes extended customizable attributes like:
- asset tag
- site name
- category
- description
- function
- asset tier
- maintenance
- asset location
- asset primary contact
- service contact
- notes
All above are text fields where users can annotate properties based on the needs.
Users can show/hide columns for their own session. Use Modify columns button to change columns and order. Preferences are stored in the user cookies.
Use Export table button to export table content based on the current view.
Click Info button in the endpoint row to access endpoint full properties.
Endpoint properties
To access Endpoint full properties, click Info button in the endpoint row from Servers and workstations table. The Details window contains 3 sections:
- Hardware details
- Extended properties
- Installed software
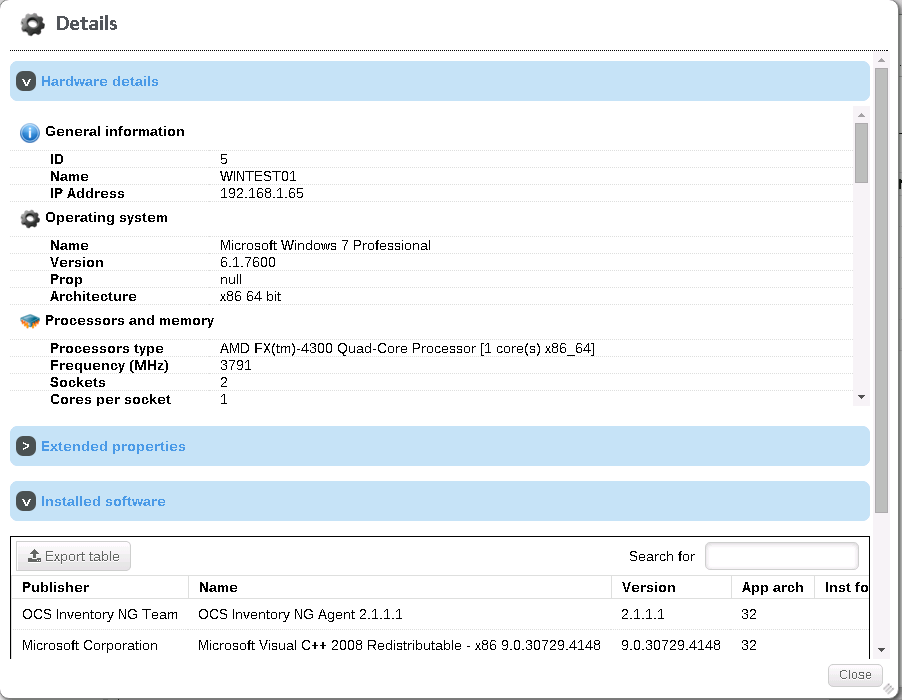
The Hardware details panel contains hardware full properties of the target endpoint. The Extended properties panel contains user customizable fields. Click a field to update its value. The installed software pane shows all installed software on the target endpoint.
OS catalog
The OS catalog view gives users access to operating system in the catalog.
Software catalog
The software catalog view gives users access to all software catalog from all endpoints.
2 Use THRUK
For a complete documentation check THRUK official website at http://www.thruk.org/.
3 Use NAGIOS
For a complete documentation check NAGIOS official website at http://www.nagios.org/.
See also
- Atlantix Enterprise Monitoring 3 – What’s new
- Atlantix Enterprise Monitoring 3 – Product guide
- Atlantix Enterprise Monitoring 3 – Planning and deployment guide
- Atlantix Enterprise Monitoring 3 – Installation guide
- Atlantix Enterprise Monitoring 3 – Administration guide